ThingsIX is a decentralized global network for the Internet of Things (IoT). It's designed to reward gateway operators for providing reliable coverage and delivering trustworthy data to end users, using blockchain technology for this purpose. ThingsIX has introduced unique trusted mapping hardware that enhances network coverage and validation. The platform is open to both existing and new LoRa®-gateways to join the network.
In this guide, we are going to show you how to get set up with running ThignsIx on your Nebra or third-party Helium hotspot.
Getting Started
1. First, you will need to add your device to our Nebra dashboard and purchase a subscription license to access the Premium features such as multi-mining. Go to https://dashboard.nebra.com/register/ to register for an account. You can find further information on how to set up and add your device to the dashboard here.
If you are a new dashboard user you will receive a 14-day free trial and your hotspot will automatically update with the Premium Firmware.
It can take up to 24 hours for your device to update with out Premium firmware
Before you can start registering your gateway and earn rewards you will need to setup your wallet. With this wallet, you will manage your gateway and receive earned rewards. You will require a wallet that:
- Supports the Polygon network
- Supports ERC-20 tokens and contract interactions
- Contains Polygon Matics to pay for translation fees
The dashboard currently supports Metamask, Coinbase wallet app and any wallet that can be connected with WalletConnect.
2. Preparing your wallet:
Matics
ThingsIX is built on the Polygon blockchain. Polygon uses the MATIC token to pay for transaction fees. MATICs can be bought and obtained through various exchanges.
Please make sure you select the Polygon network when withdrawing MATICs.
THIX
The next step is to obtain THIX tokens. You can either retrieve this by claiming rewards (if you received any) or by exchanging them via an exchange.
Connecting wallet
To be able to interact with the smart contracts of the ThingsIX network you will need a Polygon Wallet. Because of Web3 standards that are used by ThingsIX and the ThingsIX web-app, a lot of wallets are supported.
To start connecting your wallet, click the Connect a Wallet button in the top-right corner of the dashboard at https://app.thingsix.com/:

Here you get an option to select the wallet you are using:
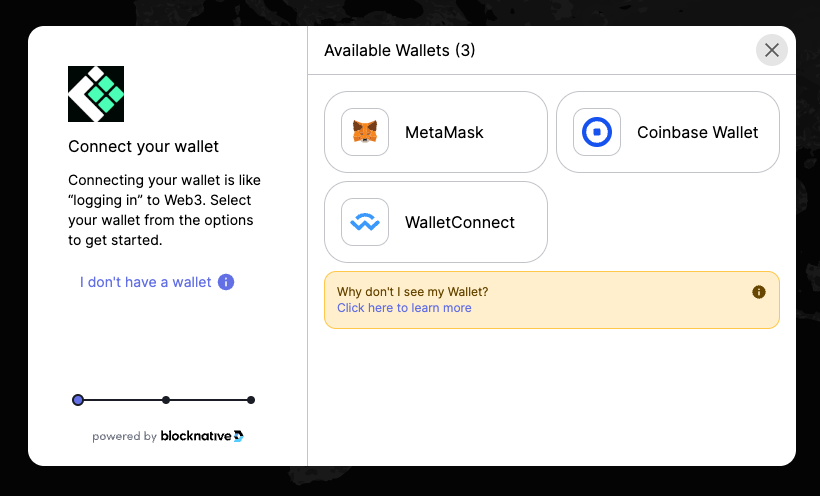
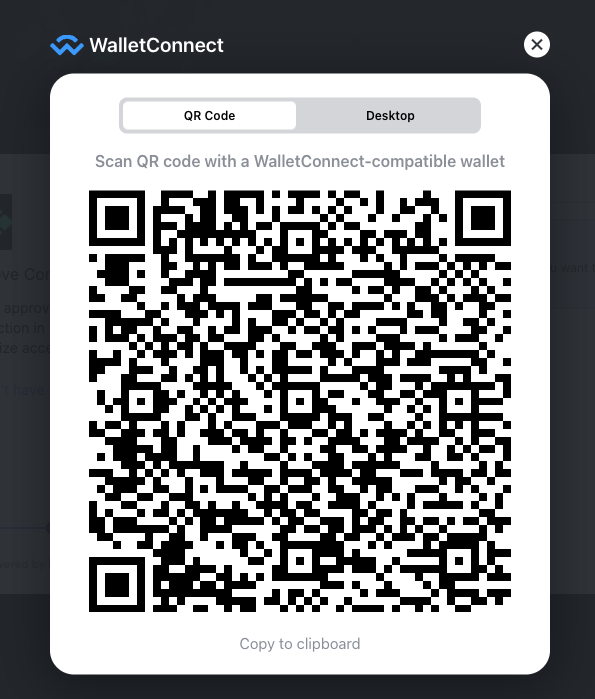
MetaMask and Coinbase Wallet are two popular options, other popular options such as Ledger support can be found by clicking WalletConnect:
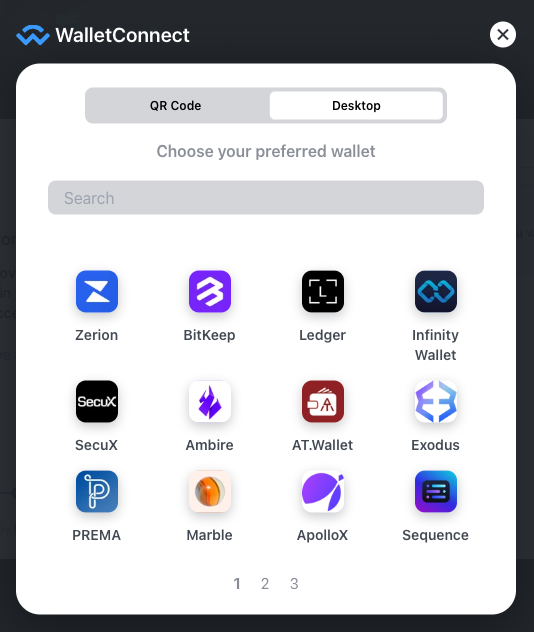
Desktop apps like the Ledger Live app can be found by clicking on Desktop:
You will be taken to the selected wallet and have to follow the wallet-specific options. Please note that some wallets don't "pop up" and you have to open them manually (also while doing transactions).
3. Open up the device local dashboard by typing in the IP address of the hotspot into the web browser. Enter your default password which is the Ethernet MAC address without the colon. Navigate to the ThingsIX menu and enable ThingsIX. You can find further information on accessing the device locally here - Local Diagnostics
Enabling ThingsIX will automatically disable the Helium network
Once you click "Enable ThingsIX" your device will be rebooted.

Once your device has rebooted go to the ThingsIX menu and enter your Polygon wallet ID.

You will be redirected to ThingsIX dashboard to onboard your device. If you receive an error you can visit app.thingsix.com/gatewys/onboarding/

Click on "Add" and your device will be ready for onboarding to ThingsIX network providing you have sufficient THIX balance.
In the next page you will see the transactional fee for onboarding your ThingsIX gateway. The THIX/EUR exchange rate updates frequently there is a chance that the calculated amount of THIX tokens to pay for the fee isn't enough at the moment that the transaction is processed causing your onboard transaction to fail.
Therefore the form offers you a method to set the max fee (Fee Tolerance) that you are willing to pay. It is guaranteed that you never pay more than max fee. If max fee is higher than the onboard fee at the moment the transaction is processed you will only pay for the current onboard fee.

After you press the "Onboard 1 gateway" button your wallet will ask you to sign the onboard transaction. Once the transaction is processed navigate to the gateways overview page through the menu Gateways-> Overview. You will now see a pending gateway onboard event. We require 128 block confirmations before your onboard is accepted.
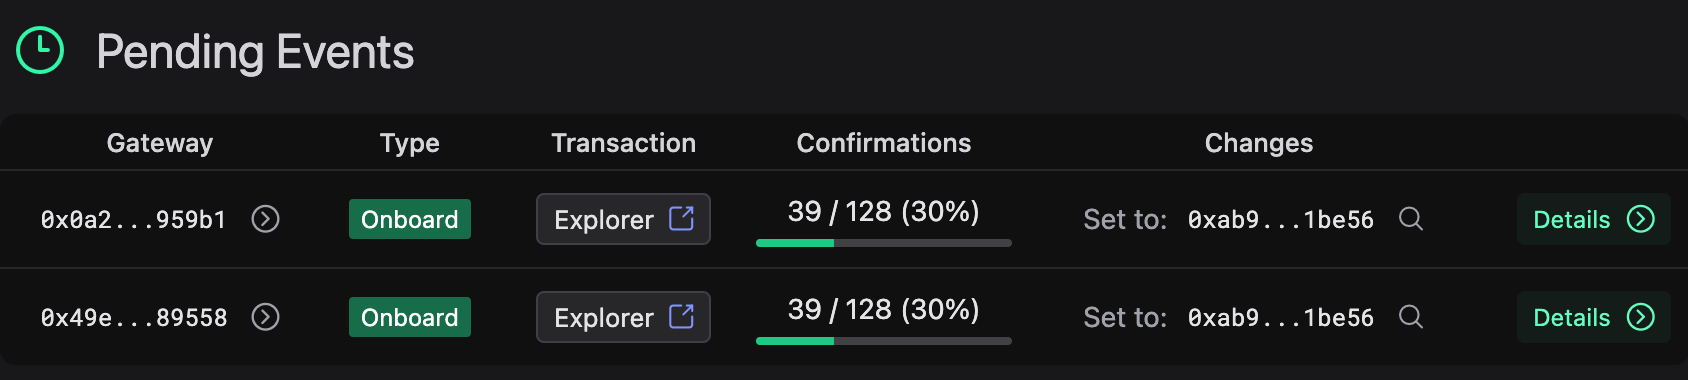
After 128 blocks the onboard is confirmed and you will see the gateway listed in the Onboarded Gateways list. You
have now successfully onboarded your gateway.
4. Set gateway details- The last step to do before your gateway is operational is to set its details.

Click on the Details button in the last column of the gateway. This will take you to the details page of the gateway. If the gateway is owned by the connected wallet the dashboard shows several buttons on the right. With the edit button you can set the details of the gateway and the transfer button allows you to send the gateway to a different wallet.
Click on the edit button. A form opens that allows you to specify the gateway-specific settings. The frequency plan is automatically derived from the location that you picked. Make sure to zoom in maximum when selecting the location. The update fee has the same problem as the onboard fee that the THIX/EUR exchange rate can change.
5. Once your device has been onboarding you will see the following dashboard page on your device.
